We often face challenges in managing our files data while working in a team. Many times, the changes that we make to the files get lost or when working in a team these changes often get overwritten. These things pose problems to smooth working and management of files. Git is a version control system that has come to the rescue and eliminated these problems. But before going into the details of Git, let’s first understand what is a version control system.
So, Version control is a system that records changes to a file or set of files over time so that we can recall specific version later. E.g. as we talk about our use case here, a developer uses version control to record changes to the software source code files. However, we can use version control for any type of file system.
There is two type of version control systems – Distributed Version Control System and Centralized Version Control System.
Git is the most commonly used distributed version control system (DVCS). Every user has its own local repository and then the changes are made to a central repository. Also, it records only the changes and hence reduces the chances of code getting overwritten by others. Due to this feature, Git is very useful while working in a team and tracking the changes made to the files. Git is designed in a way that it makes it easy for the users to work on different features of a project with involvements from different developers of the team. However, at times the users are not aware of the complete set of features of Git, and hence are not able to use it efficiently. While working in a team, we come across different challenges and most common are –
-
- What’s deployed in production is different than what’s available in the master branch. It is because all the developers are working on the master branch and the time when this code was deployed, the production team made progress. Now suppose, something went wrong in production and it requires a hot fix. For this, one of the developers in first level support checks out the code of the master branch, puts the hot fix and deploys the changes. But, what if he finds a new feature in the application when he tests the hotfix locally? When he confirms with the team, he comes to know that the new feature is still in testing and can’t be released at the moment. So, it becomes very difficult for the developer to make a hotfix release. Now first he will have to revert the changes of other developers after the last deployment and then put his hotfix.
-
- It is difficult for the reviewer to review the feature change when more than one features are added at the time he goes for the review.
-
- A bug in one feature can suspend the whole deployment.
-
- It is difficult to manage the improvements and bug fixes in a feature, meanwhile, it might affect other team members in their work.
-
- It is difficult to manage the work done for a task assigned to the developer. E.g. while working with a smart enough task management application like JIRA and Bitbucket, the task in JIRA can take the corresponding working information like branch name/ pull request from Bitbucket. We can also use the JIRA automation plugins to automatically move a task to different stats based on the status of the work in bitbucket.
These seem like big challenges, but it is very easy to address them with Git. And believe me, you will never face the problems mentioned above if you use Git in a standard way. All these challenges can be fixed by the use of Git’s Branching feature. Git branch is very useful while managing different versions of the same software for a different client. For instance, when one software is deployed on different servers with different versions.
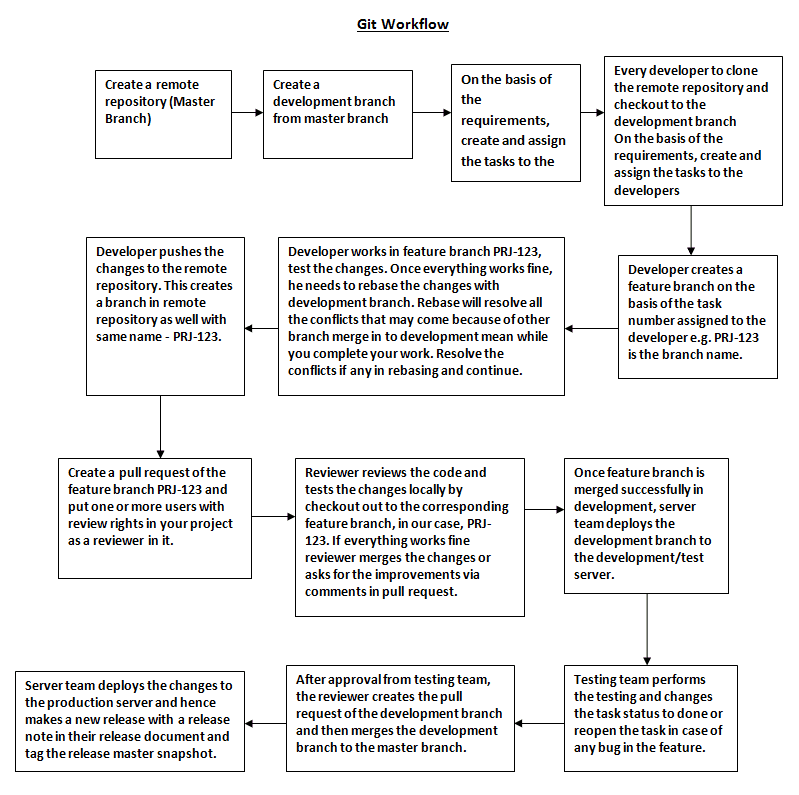
The best practice while working with Git is to create the branches, get your task code verified by the reviewer and then merge the branch in the master branch. This way it confirms the fact that master should always have a code in production. Following this, you can immediately deploy the changes to the production once your branch is verified and merged into the master.
Every software has a development server for testing and once the task is verified in testing, it’s merged into the master branch. This means we should also have a branch that represents the code instance in development. So, the best practice is to always have a development branch created from the master branch. All the feature branches should then be created from the development branch instead of the master branch. Once the tester and the reviewer approve the work done in a feature branch, it should be merged back into the development branch.
Now, to test the changes of a branch the reviewer needs to verify the code and then test the feature branch locally on his system. If everything works fine, he can merge the changes to the development and then deploy it to a development server as well. After this, the testing team can test it manually and through their automation processes. After testing team gives the success flag, the corresponding feature branch can then be merged and deployed to the production.
The basic Git commands involved in the above process are –

A place for big ideas.
Reimagine organizational performance while delivering a delightful experience through optimized operations.

The basic Git commands involved in the above process are –
-
- Open your favourite browser and insert this URL (ip_address/zabbix)
- If you see this Welcome Page then click `Next step` button
- Check pre-requisites and click `Next step` button
-
- To clone a project – Git clone <remote-repository-url> e.g. git clone http://abc.git
-
- If you have a project on local machine and if you want to add it to a remote repository, that you have created on a remote service or remote server. Then cd to your project directory on your local machine and run the following commands – Git init – Git remote set-URL origin <remote-repository-url>e.g. git remote set-URL origin http://abc.git
-
- To checkout to a branch – Git checkout <branch-name> e.g. git checkout development
-
- To create and checkout to a new/feature branch (before this please make sure to run git pull and git reset –hard origin/master to clean all the changes to master/development branch you made locally. There should not be any changes in the master/development branch, changes should be made to these branches via merge only) – Git checkout –b <new-branch-name> e.g. git checkout –b PRJ-123
-
- To add changes to the staged area from the working area – Git add <files-to-add-to-staged-area> e.g. git add README.md
-
- To commit changes to a remote repository – Git commit -m “<commit-message>” e.g. git commit –m “added readme file”
-
- Pull changes to a branch (take updates from remote repository) – Git pull
-
- Rebase changes from parent branch (before this please checkout to the parent branch and update it via git pull and then again checkout to your feature branch) – Git rebase <parent-branch-name> e.g. git rebase development, Git rebase –continue
-
- Generally, we should always have only one commit in our pull request, in case there are multiple commits from your side then before pushing changes to the remote repository you can merge all the commits into one using squash all the commit at the time of git rebase, please follow the below steps while merging all commits into one commit Git rebase –i <parent-branch-name> e.g. git rebase -i development, it will open a file in terminal. Press i to enter insert mode change all the # commit to squash except the first. Press Esc and :wq to save it. It will open a comment file that you want to consider after merge all commits into one. Edit it if you want to via entering edit mode as mentioned above or just press :wq and it will merge all commits into one. After this, you can push your changes to the remote repository. If you see in remote repository in your branch, it will only show one commit and on click of that commit, you can see the commit message that you put above while rebasing interactively.
-
- Push changes to the remote repository – Git push
- If you are pushing to a branch that does not exist in the remote repository then you need to run the following command Git push –set-upstream origin/<branch-name> e.g. git push –set-upstream origin/PRJ-123
Thus, we can see that Git is very helpful in managing problems related to working in a team. It is one of the best version control systems that can be used to manage your files. All you need is a proper understanding and you are good to go.


